Keihin CV Carb Kit Installation Instructions
A copy of these instructions comes in every Keihin CV Carb Kit.
1) Drain the left side fuel tank. Remove the original fuel line, and the
left side petcock.
2) Remove, and safely store the air cleaner.
3) Disconnect the throttle cable from the Linkert Carb, and from the bracket
at the top of the front head bolt. Remove the throttle cable grip, by loosening
the grip ring, and remove the inner wire cable completely.
4) Remove the Linkert Carb, (and it's brace). Put the (3) tapered screws
into the Linkert, and do not re-use on the new manifold!
5) Loosen the manifold nuts slightly, so the manifold can move up, and down
some. Use a proper 1 13/16" wrench.
6) Make sure the CV carb is ready to mount: 1)Perform the needed mods to the
cable bracket, and grind the linkage on the side, 2)Install the Jet Kit,
3)Set the mixture screw to 3 1/4 turns, 4)Adjust the Idle speed screw so the
butterfly just exposes the first of (5) transition holes, 6)Install the rubber
vacuum plug on the carb, 7)Install the carb support onto the float bowl with the
metric allen screw (leave a little loose).
7) It is best to first install the carb to the new manifold to get the
rubber hose aligned well, and to get the clamps tight. Push the rubber hose all
the way on to the new manifold, and tighten the clamp right up against the edge
of the rubber with the clamp screw at the bottom, and facing to the rear. Slip
on the second clamp, and push the new manifold into the rubber hose until it
bottoms against the carb. Make sure the carb, and manifold are square to each
other. Tighten the second clamp. The carb should now be installed, and removed
as a unit like the Linkert.
8) Put some teflon tape on the petcock threads, and install it into the
brass 90 degree elbow. Use some teflon tape on the elbow, and install the elbow
with petcock into the left side tank with the petcock pointing to the rear.
9) Install the new metal fuel line. Form it to fit on nicely, it bends
easily, and snug it up tight.
10) Using the new carb gasket, carefully align, and mount the carb/manifold
to the Indian manifold. Start all (3) new screws, push the unit on very square,
and flush, then tighten all (3) screws. Make sure the new manifold is not cocked
a little causing an air leak. Make sure the carb brace is tightened to the small
case through-bolt, and at the float bowl.
11) Fully tighten the manifold nuts to secure the carbs position. Have you
properly sealed the manifold nuts, and brass rings with "Permatex Hylomar HPF"?
Now would be the best time.
12) Check for rear cylinder fin clearance from the carbs linkage by fully
opening the carb, and observing clearance. It will be very close, and sometimes,
a tiny bit of fin might need to be trimmed.
13) Install the 1 1/2" rubber hose onto the carb, and then the fuel filter
followed by the 3" rubber hose. Be very careful not to break off the plastic
fuel fitting on the carb. These can be replaced with a brass "L" from a H-D
dealer if broken. Use the hose clamp to tighten the rubber hose to the new metal
fuel line.
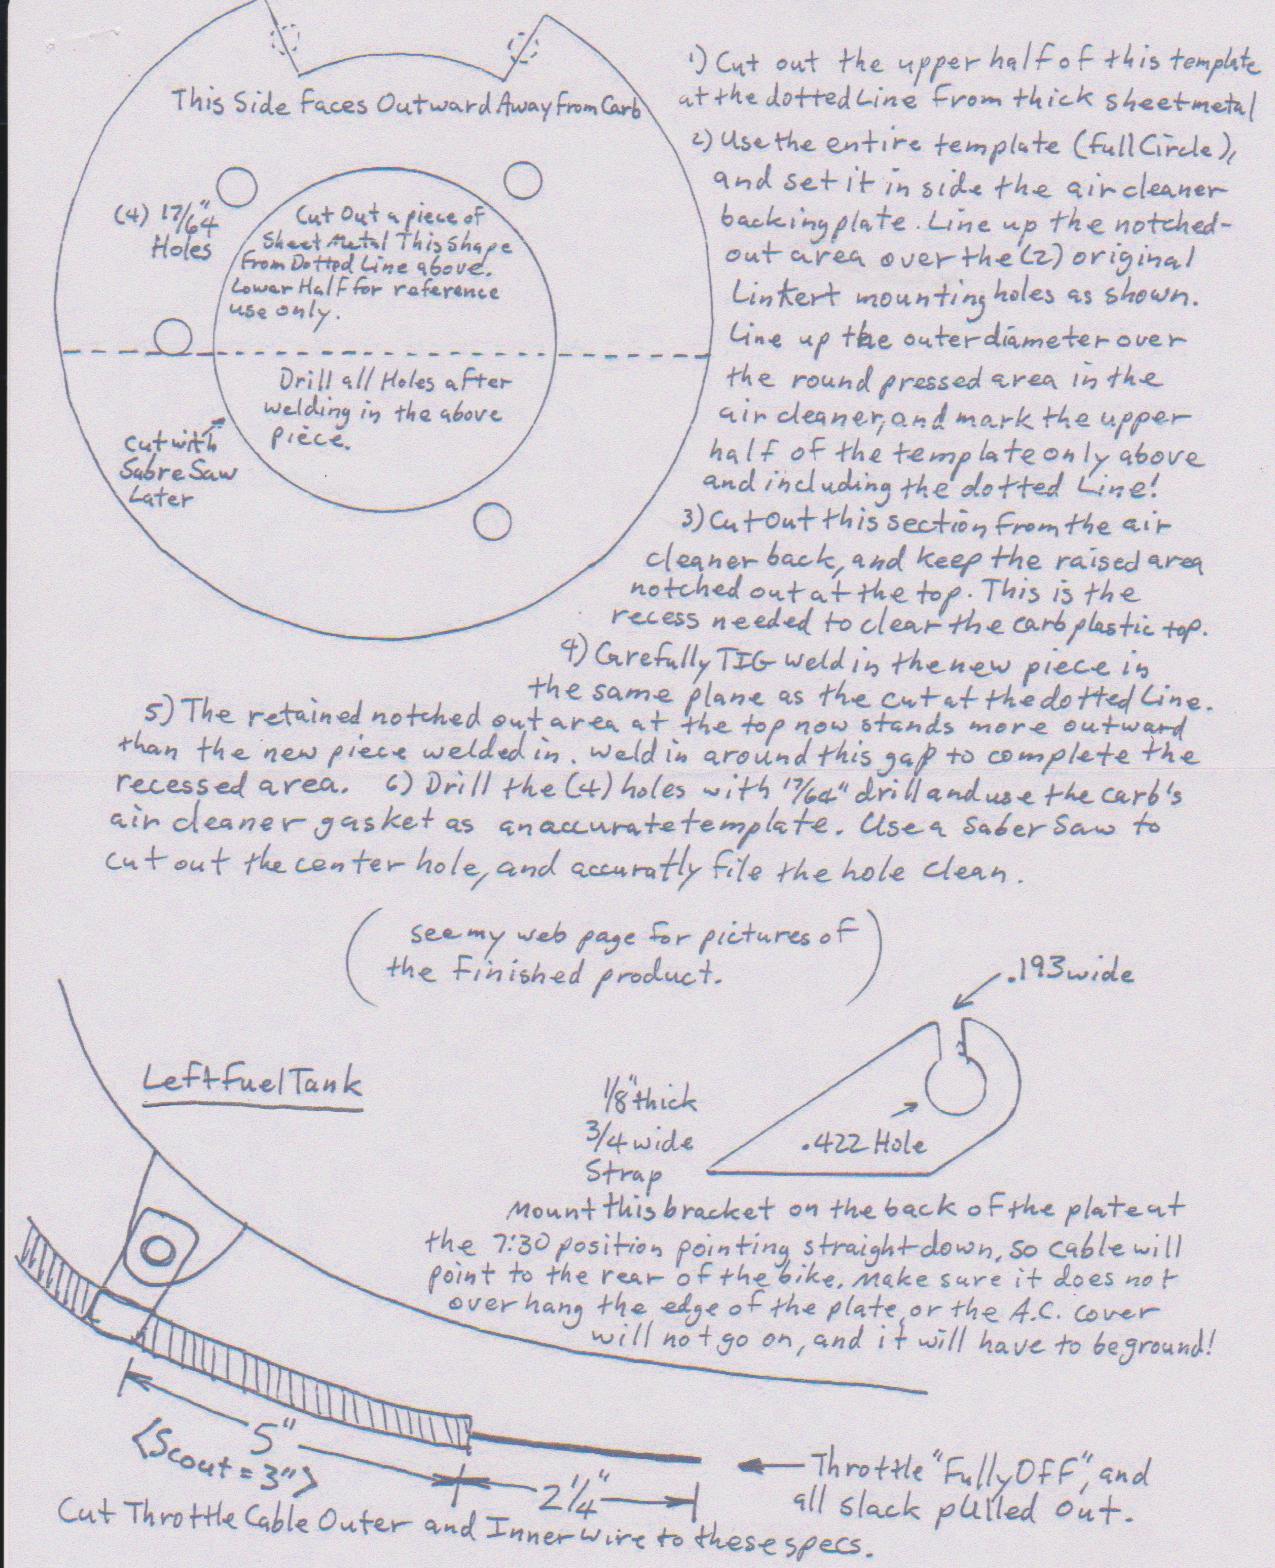
14) Prepare the throttle cable for the cable adapter. With the inner
throttle cable fully removed, cut the outer spiral jacket exactly 5" from the
rear edge of the cable clamp at the left fuel tank's forward/lower mount. File,
or grind the end to make it clean and square. Make sure the inner cable has no
bends, or kinks in it, and fully lube the inner cable, and throttle grip parts.
Put lots of grease on the wire, and re-insert it a couple times to get plenty of
grease into the outer jacket. The grip, and cable need alot of lube! Fully
install the inner cable, and the throttle grip. Turn the throttle to the full
"off" position, and pull out any slack on the inner wire at the carb end. Cut
the inner wire exactly 2 1/4" from the edge of the outer jacket.
15) Use one of the cable adapter ends (these are marked ".232, and .250 for
the (2) possible sizes of outer jacket), and slide it onto the inner wire until
it fits up over the outer jacket. Now, slide the aluminum "slider" over the
inner wire untill it's end is at the edge of the hole where the new throttle
cable barrel drops in. Tighten the (2) set screws with the provided allen
wrench. Install the bigger barrel end of the new cable onto the carb, and feed
the cable onto the carb's cable bracket. Slide the cable adapter's tube over the
new cable about 6", and drop the other barrel into the "slider". Slip the tube
to the left, over the slider and onto the cable end piece. Now pull on the new
cable's outer jacket to expose the inner cable (opening the CV carb), and slip
the cable end with the slot over the inner wire, and drop it into the outer
tube. Check for cable slack. The slack can be fine tuned by moving the "slider"
left, or right on the original throttle inner wire.
16) If the new cable interferes with the petcock, the carb's cable support
needs to be modified (per my modification section) for a better lay of the
cable.
17) Test the feel of the throttle operation. Remember that the throttle
cable now pulls against a strong carb spring, and the cable, and grip must be in
perfect, well lubed operation. If the throttle jams sometimes while opening, it
will need to be inspected, and fixed. It will work smoothly when everything is
setup right.
18) On the choke cable, loosen the nut, and washer, and slide them back out
of the way. Slide the air cleaner's choke support over the thin portion of the
choke cable, and slide the bracket over the threaded portion of the cable. Leave
loose temporarily. Mount the air cleaner back to the carb with the adhesive
gasket, and the (3) screws, and lock washers. Now tighten the choke cable nut
only "finger-tight". Never use a wrench here. The cable is plastic, and it will
break! Install the cover after the bike is started, and adjusted.
19) Put fuel in the tanks, turn on the petcocks, and check everywhere for
leaks.
20) Pull on the choke (the choke cable tension is adjusted by a little
knurled ring at the edge of the knob), fully retard the ignition, pump the
throttle once, turn on the ignition switch, and kick. When it starts, set the
idle speed, then the mixture, then the idle speed, then the mixture, etc. The
mixture should be between 2 1/2 and 3 turns out. As the bike warms up, the choke
should be slowly turned off, and the advance slowly pulled on. The choke is
needed to fully warm up the bike. This is normal. Once riden, the bike might
need a little choke to start after it has cooled off some. Go Ride, and
enjoy!
Important-Read Each Catagory Below for Full Details!
CONTACT INFORMATION:
James R. Mosher
1-505-466-7870